Robes pas chers!!

Guest post by Rachael at Talk 2 the Trees.
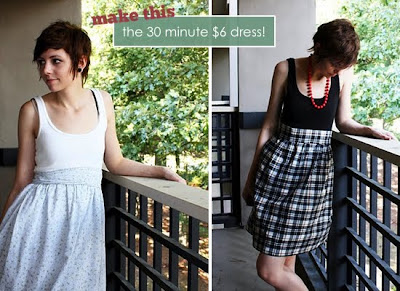
The perfect dress is hard to come by. I like my dresses to be cheap, and long enough. (I’m not a fan of super short dresses!) Cheap and long dresses don’t seem to go hand in hand.. so, if you want something done right, you have to do it yourself! Here is a tutorial for a simple yet cute dress. It takes about 30 minutes to make and costs much less than most dresses!
Here’s Your Supplies List:
Here’s How you Make it:
1. Cut the tank top almost in half. This will depend on your bust size, and how short you want your dress as well. The shorter the tank top, the shorter your dress will be.
2. For the bottom part of your dress take the fabric and wrap it around your waist about 1 and a half times, and cut in a straight line. The fabric will come to you already folded, don’t unfold it. This way you have kind of a bubble hem. You don’t need to hem up the bottom at all, and the inside will look like the outside. I never measure, I never use patterns… Sorry if this seems silly!
3. Next you fold your fabric in half. Remember it’s already folded, so you are folding it again, creating a skirt. Sew up the short side. (There will be four layers of fabric that you are sewing.) So, you have kind of a big blocky rectangle skirt.
4. Next open it up and change your sewing machine’s tension so it will create the biggest stitches possible. Instead of sewing a waist band in like a normal skirt, you are just sewing a straight line around the two layers of fabric joining them together (You are sewing the raw edges, not the bubble hem).
5. We are going to create a ruffle. Don’t do a back stitch when you start sewing around the skirt or after. To make the skirt ruffle you hold the thread and scoot the fabric down. Make sure the skirt ruffles are evenly distributed and pretty loose.
6. Next, turn the skirt part inside out so that the raw edges (from when you turned it into that big blocky skirt) are facing out, and put the tank top inside as pictured.
7. Now pin the tank top and the dress together. Once it’s pinned make sure that the tanktop part of the dress folds out to be inside out like the skirt part.
8. Make sure that the tank top park lays flat and the skirt part is ruffled still.
9. Make sure your tension is set back to normal and sew the skirt and the tank top together just under the previous stitches.
10. Remove the pins and the dress part is done! Now for the sash.
11. Cut a strip out of the left over fabric, about double of how thick you want your sash to bed. Fold it in half long ways so that the printed side is facing in. And sew up the sides.
12. Turn it right side out and finish up the edges, and you are done! The sash is not actually sewn onto the dress, it’s removable and is just tied in the back. You could always use a regular belt or another coordinating fabric for the belt!
Here’s the tutorial in pictures…


Believe it or not, this dress only took about 30 minutes to make. And get ready for this… It cost about $6 total! If you are looking for a budget dress that you can make on your own, this is it.
En tout cas, si ma maman lit cet article, tu sais ce que je veux avoir comme cadeau maintenant huhuhu!

Commentaires